|
Helpful Articles to Improve Your Pattern Work
How to Tell If Your Pattern Work is Correct
Riding Figures
Changes of Rein (different exercises)
How to make the same size circle
How straight is straight?
Perfect Your Patterns
Turn on the Forehand
Turn on the Haunches
The Halt
Horsemanship
Riding Circles, Figure Eights and Serpentines
Practice Patterns
1.
Trot down the right rail to the first quarter point. Continue to trot and execute a two loop serpentine across the width of
the arena, demonstrating one change of diagonal. Continue to trot down the left rail to the midpoint. Halt. Turn and canter
on the left lead a diagonal line to the midpoint of the far end. Halt. Turn and canter on the right lead a diagonal line to
the midpoint of the right wall. Halt. Back your horse parallel to the wall (at least three steps and not more than eight steps).
Return to the end of the ring at the trot.
2.
At a trot, proceed down the center of the ring to the far end. Stop. Back a few steps. Move forward and turn to the left.
Execute a four loop serpentine at the canter, beginning with the left lead; showing simple changes of lead. (Use your trot
line as your center line.) Stop at the ingate.
3. Using the rail to your right, trot along
the straightaway on the right diagonal. At the midpoint, execute a circle at the trot. Halt. Canter on the left lead the remainder
of the straightaway. Without stopping, canter a circle. Halt. Reverse and return to line demonstrating two changes of diagonal
along the straightaway.
4. Using the rail to your right, divide the
straightaway into three sections. Canter the first section on the left lead, trot the second section on the left diagonal,
and trot the final section on the right diagonal. Halt. Reverse. Canter a circle on the right lead. Halt. Return to line at
a show trot.
5. Trot along the right rail to the far end
of the ring. Facing center ring, execute a figure eight at the trot. Stop. Reverse. Canter a figure eight. Stop. Return to
line at show trot. You may use either rail.
6. Using the right side of the ring, trot
a three loop serpentine. Begin on the right diagonal. At the completion of the final loop, halt. Canter a circle on the left
lead. Continue at the canter across the ring to the opposite straightaway. Stop at the rail. Turn left and show trot back
to line.
7. Divide the ring into four segments and
perform a four loop serpentine. First loop at a canter on the right lead. Second loop at a trot on the right diagonal. Third
loop at a trot on the left diagonal. Fourth loop at a canter on the left lead. Continue cantering a full circle. Stop. Turn
horse to return down an imaginary straight line. Divide arena into three segments. Canter the first segment on the right lead.
Stop. Canter the second segment on the left lead. Stop. Trot the third segment. Stop at end of arena. Return to line.
8. Use an imaginary straight line down
the center of the arena as a guide. Trot to the 1/3 point. Continue trotting into one circle to the right. Stop. Canter a
circle to the right. Stop. Trot a circle to the left. Stop. Canter a circle to the left and continue cantering out of the
circle to the 2/3 point. Stop. Drop your irons. Trot, posting on the right diagonal to the end of the arena and around to
the left; continue trotting to the midpoint of the straightaway. Stop. Pick up irons. Back. Canter on incorrect lead to the
end of the straightaway. Drop to a trot.
Return to line on correct diagonal.
9. Trot a diagonal line to the center point
of the straightaway. Continue trotting and perform a circle to the left. As you come out of the circle, change to the left
diagonal and trot on a diagonal line to the end of the arena. Stop. Turn left. Canter on a diagonal line on the right lead
to the center point of the opposite straightaway. Stop. Turn left. Trot on a diagonal line to the end of the arena on either
diagonal.
10. Execute a three loop serpentine at the
canter, demonstrating two simple changes of lead, beginning on the left lead. Stop. Trot a circle on the correct diagonal.
Halt. Turn and trot a line down the center of the serpentine. Change diagonal every four strides, beginning on the incorrect
diagonal. Halt.
Patterns 1 - 10 From the 2005 Morgan Horse Judging Handbook
Workouts from Missouri Horse Shows Association
Trot to the opposite end of the
ring from the gate. Starting from the center of the ring as if performing a figure
8 trot a circle to the left. Halt. Pivot
90 degrees. Trot a circle to the left.
Halt. Pivot 90 degrees. Trot
a circle. Halt. Pivot 90 degrees. Halt. Pivot 90 degrees to face the center
of the turn. Trot back down the rail from which you came and return to the line
up.
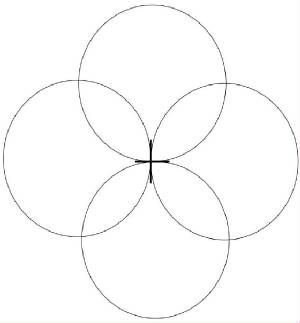
| Cloverleaf shape |
|
Tests
that must be performed by equitation riders. All circles and turns must be performed on correct leads.
1. Address reins—the
process of laying down reins and picking up reins (only asked in line up).
How To (from Helen Crabtree's Book): "It should go without saying that all reins should be held flat, not twisted. You will find that the snaffle reins are buckled together and the curb is sewn together. The difference in the attachment of the reins makes for easier identification when they are sorted, so this
difference should be noted. To lay the reins on the horse's withers, first make
certain that the horse is well parked out (he will stand quieter). Now, with
very relaxed grip, slide the hands back to the ends of the reins (being towards you) to a height just clearing the pommel
of the saddle (the U-shaped thing). As the ends of the reins approach your hands widen the hands until the reins are taut
and making a straight line across the withers. Carefully place the reins on the withers and release. The snaffle rein should be laying directly on top or behind the curb (withers – curb – snaffle
– saddle). If it does not come out of your hands this way, place the reins
in this position with the right hand. To pick up, first grasp the two reins at
the center points (buckle and stitching) with the first two fingers of the right hand and lift them about two inches above
the withers. Beginning with your left pinky, place each succeeding finger around the reins in this order- snaffle, curb, curb,
snaffle. The thumb goes under the four reins to complete the grip. With this
proper assortment of the reins, draw the right hand back and slide the left forward to a few inches longer than the usual
riding length of the reins (remember you are in the line up so usually your reins are a little longer). As you release the bight, release the curb rein first and tighten slightly more on the snaffle before you
release it. In this way, you will be avoiding jabbing the horse on the curb and causing him to lower his head out of position.
As soon as the bight has been released, grasp the two reins with the right hand as they are released by the left fingers.
Keep the hands low at all times and avoid aggravating the horse with fumbling movements.
This act should be done while keeping the proper position (legs correct, back straight, head straight with just eyes
looking down). If you usually ride with a whip practice holding it between where
the hand and thumb meet while addressing you reins."
2. Circle at a trot.
3. Performance on the rail at a
walk, trot, or canter using the correct leads and diagonals only.
4. Performance around the ring
at a walk, trot, or canter using the correct leads and diagonals
only.
5. Feet disengaged from stirrups.
Feet engaged. In the line-up only.
6. Change of diagonals on or off
the rail.
7. Execute serpentine (4 loops unless
otherwise asked) at a trot. A series of left and right half circles off center of imaginary line where correct diagonal must
be shown.
8. Back for not more than eight
steps.
9. Figure eight at trot demonstrating
change of diagonals. Unless specified, it may be started either facing the center
or away from the center. If started facing the center, it must be commenced from
a halt. At left diagonal rider should be sitting the saddle when left front leg
is on the ground; at right diagonal rider should be sitting saddle when right front leg is on the
ground. When circling clockwise rider should be on left diagonal; when circling counterclockwise rider should be on right diagonal.
10. Execute serpentine at a canter
on correct lead demonstrating a simple change of lead. This is a change whereby the horse
is brought back into a halt/walk and restarted into a canter on the opposite lead.
11. Circle at the canter on the
correct lead.
12. Figure eight at canter on a
correct lead demonstrating simple change of lead. (This is a change whereby the
horse is brought back into a halt/walk and restarted into a canter on the opposite
lead.) Unless specified it can be started either facing the center or away from the
center. If started facing the center it must be commenced from a halt. Figures are commenced in
center of two circles so that one lead change is shown.
13. Canter a straight line, on
or off the rail, with or without demonstrating simple change of lead. The judge must
specify exact lead changes to be executed and the beginning lead. In a simple
change of lead the horse is brought back to a halt/walk and restarted into a canter
on the opposite lead from the halt
or walk.
14. Ride without stirrups for a
brief period of time, at any gait requested (for not more than one minute at the
trotting phase). Riders may be asked to engage stirrups at a halt or walk.
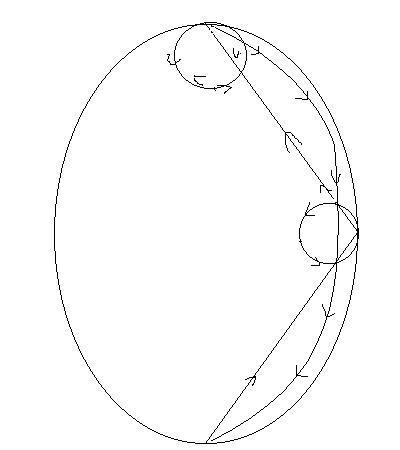
Perform one-half of a diamond. Starting at the in gate, drop your irons.
Face the midpoint of the west straightaway. Trot on the right diagonal on a straight line to the midpoint. Turn left. Canter
a circle. Stop. Pick up your irons. Turn and face the midpoint of the south turn. Canter a straight line on the right lead
to that point. Turn left. Perform a circle. Trot the first half. Canter the second half. Stop and reverse. Perform another
circle. Canter the first half and trot the second half. Trot back to the end gate. (Thank you to Amanda Pranger)
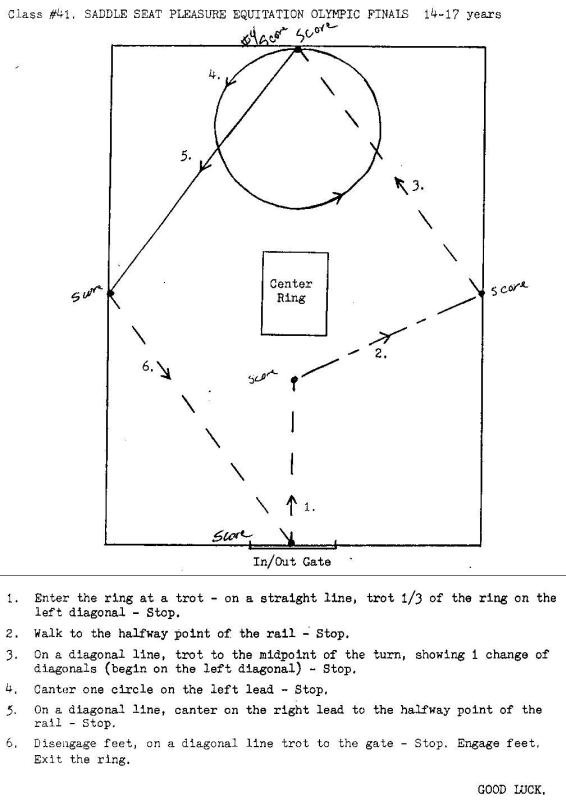
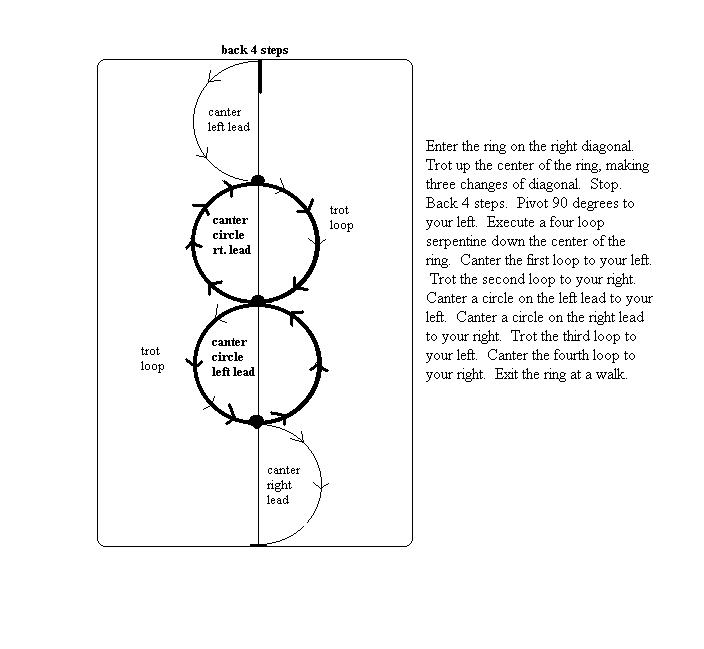
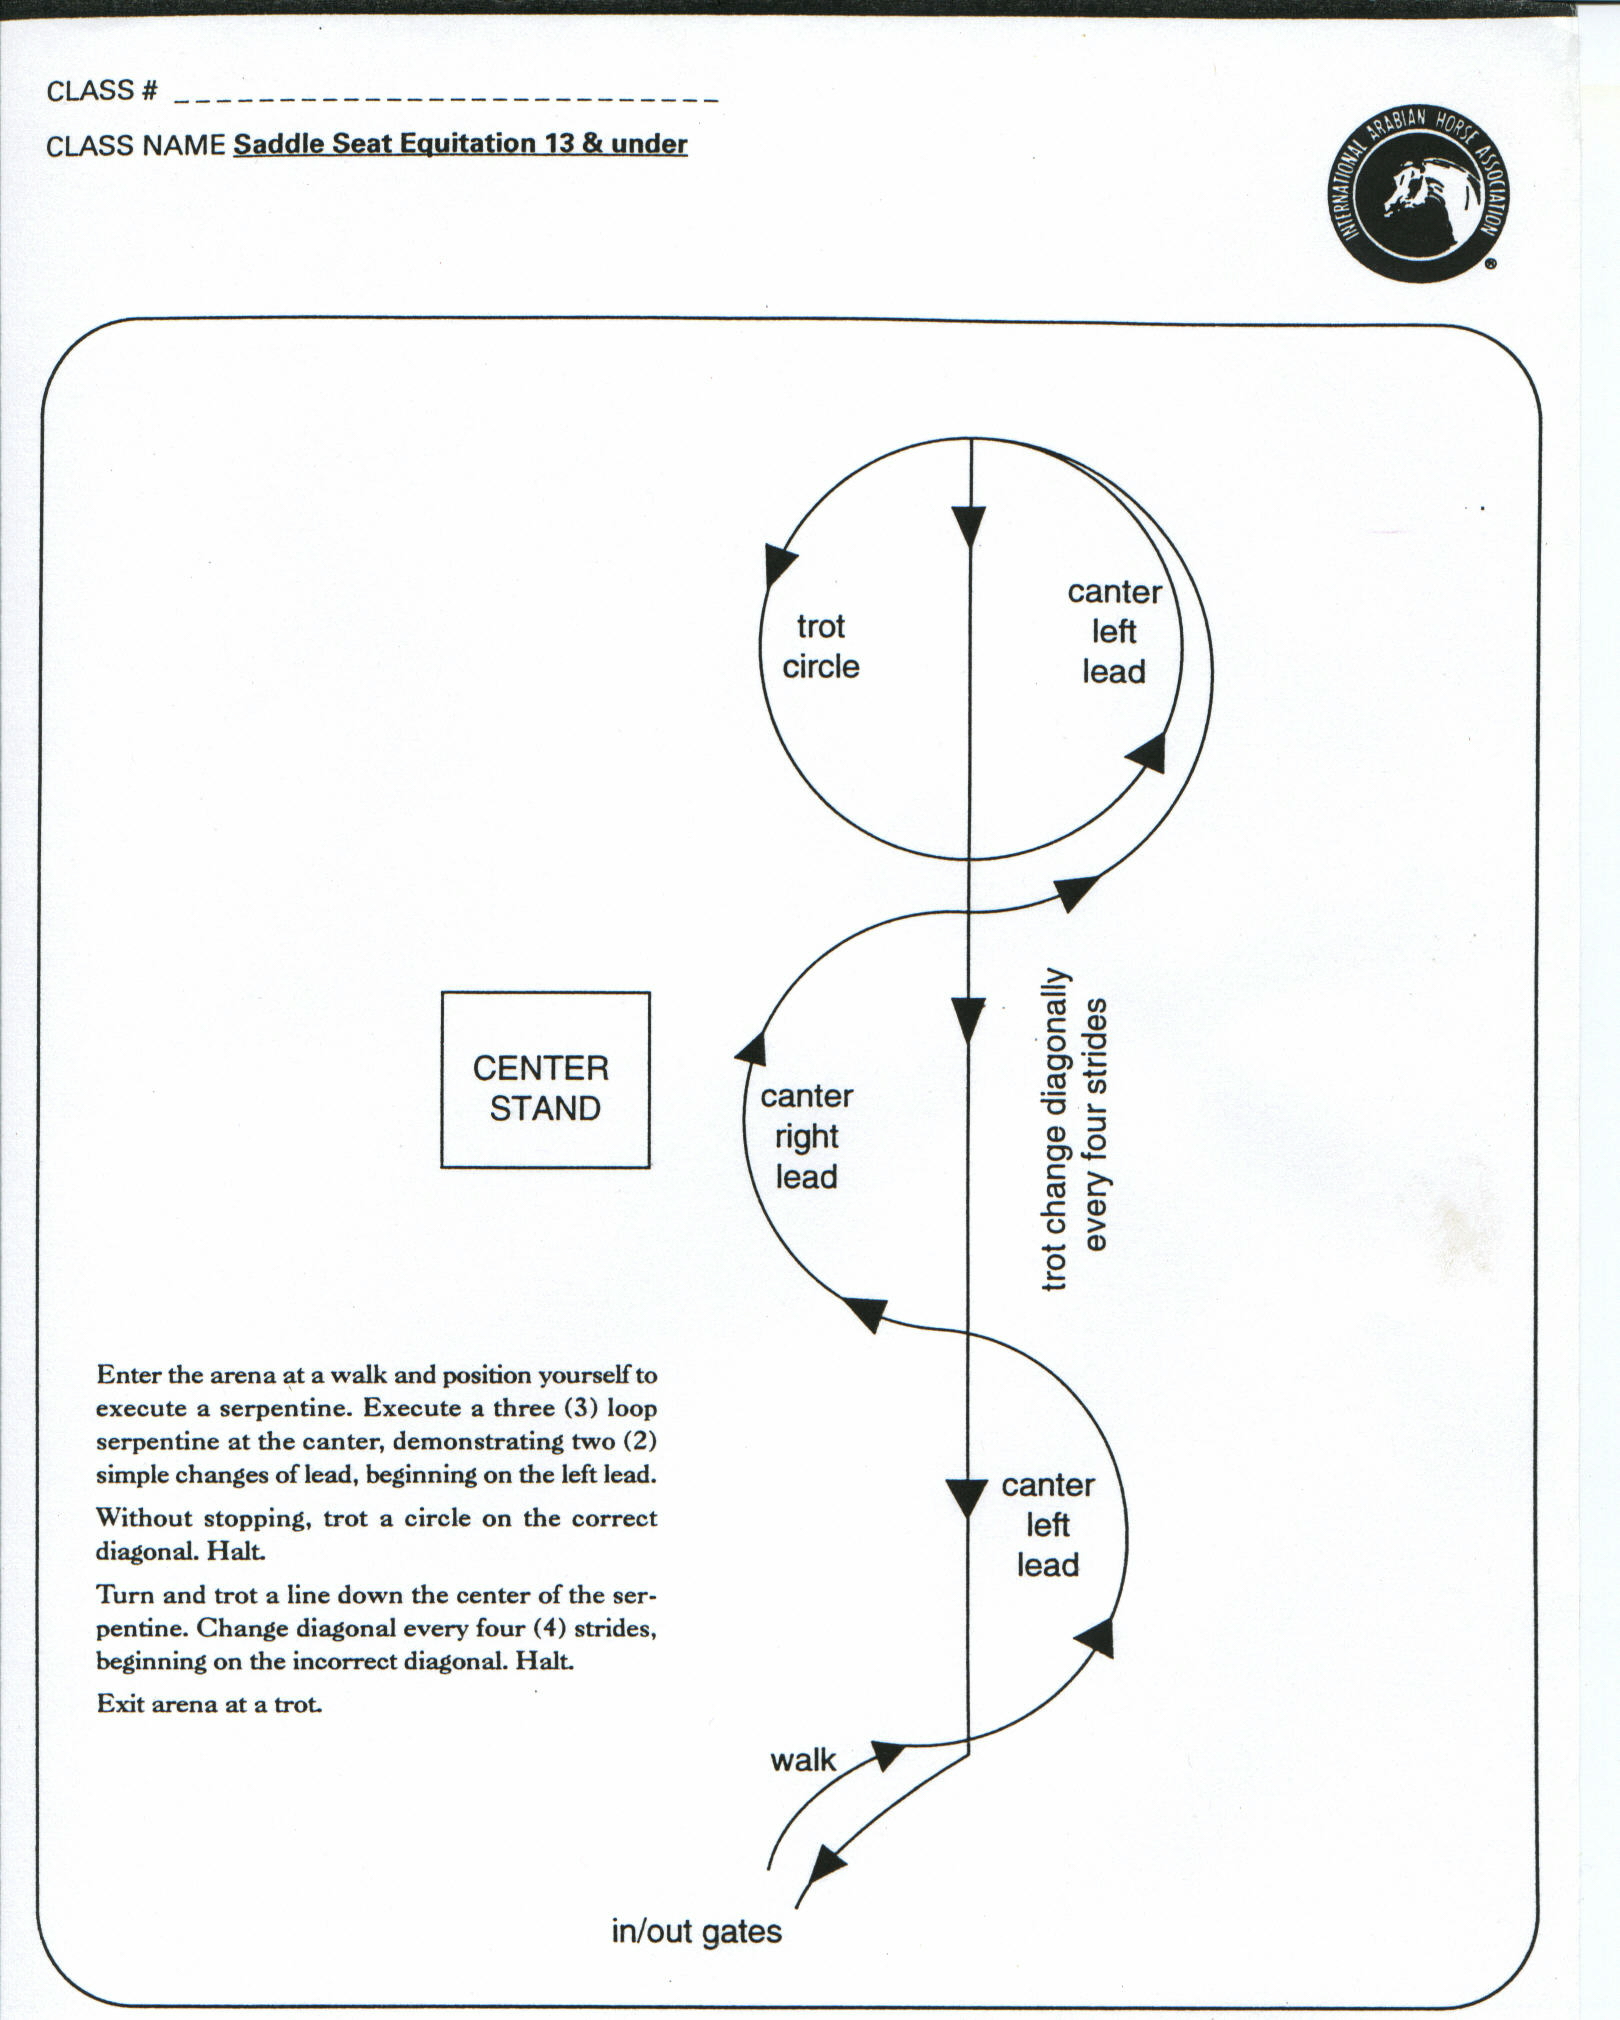
From The IAHA Equitation Manual
|


