|
Turnout is one of the most important factors in successful showing. It’s not about spending a million dollars; it’s about looking like
you did. This is a guide for newcomers, Amateur/Owner/Trainers and anyone who
wants to be perfectly turned out. If there are any questions about the below
information please scroll down to the bottom of this document.
USEF Rule EQ 116-1: Neatness is the first requisite regarding a rider's attire and the following requirements
are based on tradition and general present day customs.
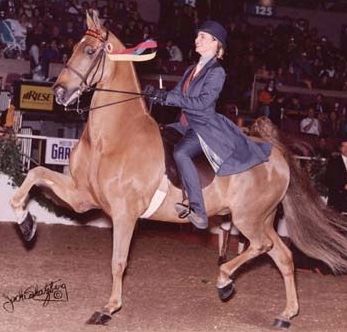
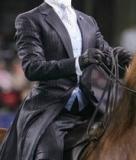
| Lauren Murrell riding Calloway's Will Gillen |
|
| A perfectly turned out rider. photo by Jack Schatzberg |

If you get a custom shirt made then the
shirt maker will be able to fit it correctly. But if you choose not to get a
custom shirt there are ways to make it look like you did and here is what you want to look for:
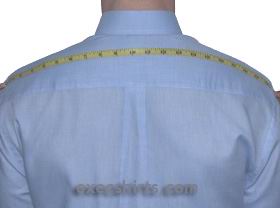
First measure your neck and sleeve to
determine your shirt size. Men’s dress shirts are sized based on these two measurements.
(For example, a size 14 shirt has a 14” neck. You want to buy a shirt with a neck measurement one inch larger
than what your neck actually measured, you’ll want to do this because you cannot button the collar if it’s the
same size as your neck, and if it’s less than one inch bigger you’ll feel like it’s too tight. (If the shirt
is for a tiny little girl, then do ¾” larger).
| Neck Measurement |

|
Find a shirt that fits well in the neck and shoulders since it is the most important
thing to look for in a shirt. The rest of it can be altered if it’s too large – but given the tiny seams in shirts,
you cannot make them larger or longer.
The
shirt collar should fit comfortably around your neck and allow you to put only one finger inside. Any larger and it will look
sloppy.
The seam that connects the shoulder to the sleeve should come close to the end
of your shoulder—this will allow it hang well.
| Shoulder Width Measurement |
|
Don’t buy a shirt that pulls across the chest – gaping between the buttons
is not attractive.
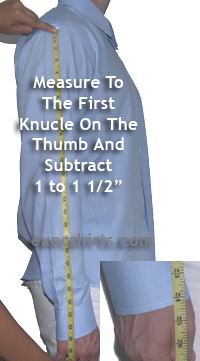
Be certain the sleeves are long enough. Sleeve length should be about one and
a half inches below your wrist bone when your arm is hanging straight down and allow about a half inch to be seen from the
sleeve of your suit, and if they are too long, no worries, they can easily be shortened by a tailor.
| Sleeve Length Measurement |
|
If a shirt rides back over the shoulders, forcing you to keep pulling it down in
front, it doesn’t fit and you’ll be uncomfortable when you’re riding.
Now here’s the fun part. You’ve shopped around and made your selection,
so the next thing to do is take it to a tailor. You might find that the store you bought your shirt from can provide tailoring
services (and sometimes will do it for free) otherwise you can find a local tailor. The trick is to pull in the sides of the
shirt or add darts (small, hidden pleats sewn in the body of
garments to make them more fitted) in the back to give that custom fitted look.
If the sleeves are too long, they can be shortened to fit like it was made just for
you. And since you started out with a shirt that already fit well in the neck and shoulders, the end result is you look like
you dropped a few coins for your custom shirt.
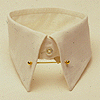
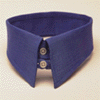
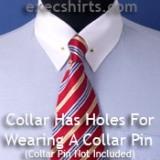
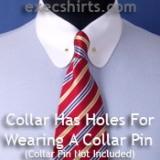
You will also want to choose a shirt with eyelet holes for a collar bar. It is traditional and makes the shirt lay correctly and neatly. The
shirt will either come with the holes or a tailor can put them in. If you do
not wish to wear a collar bar then a tab (button) collar is recommended. If you
have a long neck and the shirt usually gets lost under the coat then a high 2 inch collar will prevent the shirt collar from
getting covered. Ideally you want a ½ inch of collar showing above the coat collar.
| Eyelet Collar with Collar Bar |
|
| Preferred Choice |
| Tab Collar |
|
| Pointed Collar |
|
| Rounded Collar |
|
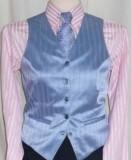
| Ideal Vest Construction |
|
The vest should
be fitted so that there is no pulling or sagging when sitting or standing. It is important check sitting and stand position
to be sure there are no problems in sitting. (An issue to watch for is to make sure the closure on your coat does not get
caught on a vest button, preventing your coat from moving with your body). The
buttons should be no higher than two inches above your bust line, and no lower than your bust line. Also, some people prefer
to leave the bottom button unbuttoned as is customary with men’s wear, although we don’t see it that often in
riding apparel.
The vest should fit smoothly but not bind during normal movement. It should not balloon
when sitting. It should be long enough to overlap the front of the pants so that the shirt does not show between them. The
properly fitted vest should be long enough for its fifth button from the top to cover the trouser waistband, yet not so long
that its points extend below the hip. The back of the vest should be approximately two inches longer than the front (at the
side seam), ensuring your shirt won’t peek out under the bottom of the vest when you’re sitting.
A well-made vest has its own definite waistline, which
is where the jod waistband should hit. Do not wear a belt with your jods, since belts add further bulk to the already layered
waistline, and tend to poke out from under the vest. A vest should not have a skintight fit but should not be too large as
to bunch up under your coat. It should be cut full enough to allow its wearer to sit comfortably with its back belt done up
to keep it from riding up the trouser waistline.
Make sure the pants sit on the waist not the hips (the narrowest part of your torso
is your waist – and it might be higher than you think! To find your waist: stand up straight, and bend sideways; where
you crease is your waist). Show pants should be higher than your normal everyday pants so your shirt does not come untucked
and peek through. It is common for show pants to be made higher in the back than in front, and higher all around than normal
pants.
| Example of where waist should hit |

|
The legs should be close fitting from waist to about lower calf and start to flare
or cut straight with a slight flare at the bottom. If the pant is fitted too
snugly below the calf it won't fall properly over the boot and you'll see the outline of the boot under the pant. The pant should also fit over the Jodhpur
boot, usually extending longer than the heel of the boot in back, and covering the arch of the foot (but not the toe) in front.
| Good Calf Fit, Bell Shape and Pant Length |

|
| by Debbie Keough |
|
| Bell shape and angle off the rider |
Jods should be at least 3 –
4 inches longer than actual inseam for adequate length when mounted. Even if
you don’t like the look of long pants under the heel you still want at the least 1 inch under the boot. Make sure length is correct while the rider is mounted. If
the underpasses are too long knot them near the button holes to the inside of pant so the knot is not seen from the bottom. If underpasses still do not hold pants down have the buttons raised.
If you use spurs on your horse have spur
holes added. Use caution when adding spur holes, as they cannot be easily relocated,
and may prevent the pants length from being altered in the future. Make sure
the holes are added ABOVE the hem; otherwise the pants cannot be lengthened if needed. Remember – spur holes are HOLES
and we don’t want to put any unnecessary holes in our suits!
Note:
Spur holes are no problem if rider is done with growth spurts or will be changing suits every year or every other year.
Know these pointers when trying on your suit so that you know what needs to be altered
if necessary. But details like shoulders and lapels are very difficult and sometimes impossible to alter after finishing.
| Good Shoulder Fit |

|
| photo by Doug Shiflet |
The shoulders of a suit are very important. It is where the suit is going to hang
and drape from. If you have a very sloping shoulder then it would make sense to have heavier padding to level up the shoulders.
Conversely, if you have very erect shoulders, you’ll want thinner pads to avoid the “linebacker” look.
Ensure the width at the shoulders provide enough room so that the fabric does not
pull across the shoulders and back when your arms are in a typical riding position. Shoulders that are too small cannot be
widened. However, shoulders that are too large can be made smaller by a professional tailor, within limits.
The drape from the shoulder to the wrist should be straight when your arms are relaxed
at your sides. Any twisting or bunching should be examined by a tailor.
Armholes need enough space for easy slipping of the arms into it and moving freely.
You can try size of the armholes by putting your hands up in riding position. It should be able to fit your arms comfortably.
You want to make sure the arm holes are fairly high, or you’ll feel constricted by the jacket.
When trying on your suit, make big arm movements and you will notice high armholes
will not lift your whole jacket up. On the other hand, you don’t want the arm hole too high, resulting in a tight, uncomfortable
feeling around the front and bottom of the arm hole.
The sleeves should end at the base of your hand when in riding position (just shy
of mid palm when arms are relaxed straight down). It should reveal about ½ inch of your dress shirt cuffs.
| Example of Good Sleeve Fit |
|
| Coat is not an equitation coat but the contrast helps you see the fit better |
| Good Collar Fit Around Neck |

|
| photo by Doug Shiflet |
Collars should always hug around the
back of your neck. The shoulder of the jacket shouldn’t bunch upward around the collar (means the collar arch is too
small) nor should there be a gap between the collar and your neck (means that the collar arch is too large). The coat collar
should be of an appropriate height for your neck length, just like the shirt collar.
Your suit collar height should be 1/2 inch shorter than your dress shirt collar.
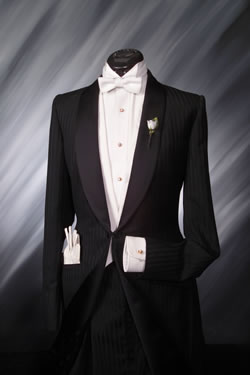
Suits have notched collars. Shawl collars
are appropriate for equitation only when the rider is wearing a formal suit (tuxedo), and the collar should be made of silk
or satin to match the coat.
| Notched Collar |
|
| suit by DeRegnaucourt Ltd |
| Shawl Tux Collar |
|
| suit by Deregnaucourt Ltd |
| Good Waist Fit |
|
| photo by Doug Shiflet |
Fasten the waist button and then place both arms in riding position. If you see any
horizontal buckling (wrinkles or pulls at the button holes or across the back of the jacket), then your suit fit is too tight
around your waist. Always remember that the silhouette and drape of the suit should be smooth and flat.
Any vertical pulls in front mean the button is in the wrong position. Unbutton the
coat and hold it together with your fingers to determine the best place to move the button.
Vertical or diagonal pulls in the back usually mean the waist is in the wrong place
on the coat) usually means the waist is too low). This cannot be fixed! Avoid buying a coat that has vertical bunching on
your back.
The length of the coat should go to the knee while standing. Riders with long thighs
should keep their jacket length closer to the bottom of their knee, and riders with long lower legs should keep the jacket
length closer to the top of the knee. Otherwise the coat will appear too long or too short when riding.
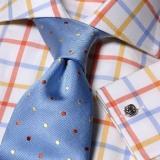
The knots of the tie are also important. With
more petite riders a four in hand knot is the best. With average sized riders
a Half Windsor would be most fitting and a Full Windsor for the larger rider such as a full grown man. However, the thickness
of the tie will determine the final size of the knot, so try them all out to find the right one for you. For how to tie these
knots please refer to the below website.
| Well tied tie |
|
How to tie different knots
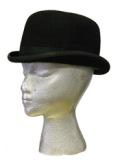
The quality of hat is very important. You should choose a hat made from fur felt
instead of wool felt whenever possible. The higher the fur rating, the better quality the fur and it will retain its shape
longer (fur ratings are noted with “X”. An 8X hat is of a better quality than a 4X hat).
| This derby is too round. It's just a circle. Your |
|
| head is not round. You want to find a derby that is an oblong shape. |
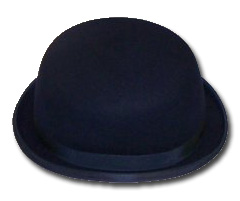
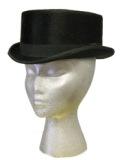
The most common hat worn in the ring is the Derby. Derbies have a rounded crown and rolled brim.
| Derby |
|
Brim width is a personal choice; however, the most popular size is 1 3/8” and
tightly rolled (called a pencil roll). The front and back of the brim should have a slight dip to flatter the rider’s
face. A smaller brim will provide a more elegant, graceful shape to the rider’s head.
You will occasionally see a Homberg, popular on the Arabian and TWH circuit but it’s
not in fashion with the Saddlebreds and Morgans especially in equitation. Hombergs have a dented crown and oftentimes a 1
½” or even larger brim. Hombergs can be more flattering for riders with a round face shape – but the wide brim
can negate that flattering effect. If you choose a Homberg, it is recommended you select one with a 1 3/8” brim in a
pencil roll.
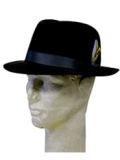
Top Hats are appropriate for evening classes, and can
be made of fur felt or silk. Silk is less expensive, but the fibers can fray and unwrap from the hat over time. Fur felt is
preferred, but can be very expensive and from a distance, the two types of hats can’t be distinguished from one another.
Top Hats are solid hats and not soft like Derbies so for comfort you might want to go up a size from your derby size and stuff
and pin if needed.
| Top Hat |
|
To measure for a hat, take a tape measure or string and place it around your head.
You want to pull the tape snug. If you are in between sizes it's best to go larger and stuff.
Measure the same way for men/boys hats. They should wear snap brim hat in a color
that matches their suit. The string should run from 1/2” above your eyebrows (If you run your fingers down your forehead
towards your eyebrows, you’ll feel a slight groove or indentation in your forehead. That’s where the string should
go), around your head just above your ear, around to just above the other ear, and meeting again above the eyebrow.
| Snapbrim Hat for Males |
|
If the top of the rider’s ears are level with their eyeballs, a standard crown
height of 3 ½” will usually fit. However, some rider’s ears are below their eyeballs, requiring a taller 4”
crown.
If you have hair that ends at any point below the hat line, you should fasten it
securely to prevent fly aways and covering up your number. Most desirable and most common is a chignon. A chignon is just a word to describe the way it’s wrapped. A chignon is a bun wrapped under itself. Braids, “Bun bows” and any other method that allows your hair to flop
around while riding is unattractive. If you have short hair, we suggest purchasing a fake bun. It ensures the rider maintains
a feminine look in the ring and finishes off her appearance perfectly. A small bow that coordinates with the suit can be added
to the center of the bun.
|